Saturday, June 9, 2012
Pieces For Sale--Updated
The only piece still available from the three posted below is the bakers' rack. I haven't kept up with this blog very well because I have opened a booth in Easy Street Resale in Pelham, AL. The bakers' rack along with many other pieces are for sale there! Go by and check it out if you haven't! You can also view my business's website by going to www.remerbish.com. Thanks so much!
Wednesday, March 7, 2012
Refurbished Pieces For Sale
So yes, I've just resigned to the fact, that keeping up with blogging is not going to happen for awhile! All you stay-at-home moms who keep up with yours, more power to you! Eventually, I'll be a regular again, but for now, bear with the sporadic posts!
Now that spring is finally coming, I will be doing a yard sale in about a month. Here are a few pieces of furniture I refurbished that I am wanting to sale. Please take a look and if you are interested, leave a comment for me! We can convo about it and I can give you more details and send you additional photos.
Two-seater bench--for sale--$150, OBO. Great solid piece. Perfect for entryway, eat-in kitchen, or bedroom!

Bakers' rack--for sale--$90, OBO. Great for extra storage or to display special pieces. Even could use for plants.

Wall unit--for sale--$55, OBO. Great small space storage solution (laundry, kitchen, bath, or office)!

Friday, November 4, 2011
DIY Double Birthday Party--3 yr old Dinosaur and 1 yr old Ballerina Party!
So when your two kids' birthdays are only eight days apart, you have to get a little creative on how to handle a birthday party! We decided to make it a fun, combined celebration! Each had their own themes (dino and ballerina) and personal touches, but it made it so much easier to do it together. So here are some pictures of the DIY projects that helped pull it all together. If you are on our reader list, you can hop over to our family blog to see pictures of the happenings of the day and updates on the kids (hopefully to be posted over the weekend)!
DIY Invitations:
After tossing around several ideas for their invitation, I ended up making them this way. Cardstock, my computer's clipart, a ruler, a paper cutter, and a little rick-rack were my best friends for this project!
First page: Dinosaur--"Stomp, stomp, stomp! Look at me! I'm turning three!"

Second page: Ballerina--"Plie, pointe, and pirouette for fun! Because Mia Lillie is turning one!"

Third page: Combined party information (address blacked-out)

DIY cupcake wrappers and toppers:
This is my latest DIY project that I'm loving for sprucing up cupcakes! As opposed to doing a lot of decorative icing, these wrappers are easy to make and can be customized to any party. I just found a template for the regular-sized cupcakes online (I can't remember the exact website, but there are plenty out there), and just altered it for the jumbo cupcakes. Loved the way these came out! And I'm still kicking myself for not getting a picture of the whole cupcake display! It turned out so cute, but oh well...
As far as the toppers, I simply bought the wands (pks of 12) at Hobby Lobby for the tutu cupcakes. For the dino cupcakes, I took foam dino stickers (again found at Hobby Lobby) and hot-glued them to toothpicks. I left the paper backing on the stickers, thus making them not stick to everything and being able to reuse them for thank-you notes (you'll see those on down).
Birthday boy cupcake:

Guest cupcake:

Tutu cupcake information: In addition to the wrappers for the tutu cupcakes, I made miniature tutus! This was so fun, although a bit time-consuming! I cut pieces of tulle, punched holes at the top, laced the ribbon through, tied the ribbon together, and added tape to the front and back to secure it onto the wrapper. I only had time to do 12, so for the additional cupcakes I used a stamp to make the wrappers that said "Mia is one!" Great thing about the tutus is that they are reusable since they were taped to a paper wrapper--so although time-consuming to make, I can reuse them! And as a sidenote, I used a single layer of tulle for the guest cupcakes, and used three layers for the birthday girl's jumbo cupcake!


DIY Decorations:
I had three main goals with the decorations--1) keep it simple and easy to do (pendant banner), 2) focus on the kids development over the year individually and together, as well as, sharing memories from the year (picture clotheslines), and 3) make it personal to each of them by adding individual touches (table centerpieces).
Pendant Banner--I ordered these two fabrics online (fabrics.com) and after looking at several other blogs, decided on the size of the pendants (which I can't remember exactly what I did, but I think it was around 9in across the top and 13in down the sides). I simply cut the pendants to size, cut out letters from felt, and hot-glued them on. I used twine and mini clothespins to put the pendants up, so it was a no-sew project (didn't have time for that!).


Picture Clotheslines--It took time to choose pictures from the whole year, but after doing that, I sent them to Walmart.com and had them printed. I made little tags to indicate the months throughout the year and any special events (Easter, baby dedication, etc). I used twine and mini clothespins again and hung them up!
Brother/Sister clothesline


Top line for brother, bottom line for sister


Sister's 9 month photo shoot:

Table centerpieces--I used burlap as the base for the centerpieces (my go-to fabric for just about everything). Then used scrap denim fabric and tulle for each display to add softness and another layer. I used theme-appropriate books that the kids already had. I liked this idea to personalize it because reading books to the kids is something I try to do everyday. I added dinosaur figures to Luke's side and pointe shoes to Mia's. I made the number picture holders out of wood numbers that I painted (originally black, found them in Target's dollar bins), a clothespin (to hold the picture) and alphabet stickers. To finish each side, I added the footprint and handprint artwork. I LOVE these and now have them hanging in our kitchen! Mia's was done as a craft in the nursery she goes to on Wednesday mornings (how fun it was to get it when I picked her up and the fact that it mentioned ballet in the poem!), which inspired me to do the handprint dinosaur for Luke. I had tossed around the idea of doing his invitations with a handprint, but after deciding that that would be too time-consuming, I wanted to use the one handprint I made. So I used colored pencils to make his hand stand out more and then drew additional spikes to make it look like a stegosaurus! I found the poem online and couldn't believe it actually mentinoned dinosaurs in it. I loved these as decorations and I love the fact I can have them as keepsakes.


DIY Party "Games" and Favors:
This year I wanted to have a couple of little activities for the kids to do, so we decided to go with a "dino bone dig" and a "fairy ballerina fashion show"! This was super easy to set up. We used our sand table (another DIY project of my dad's which I'll post about soon) for the "dig site." I used our small kids wheelbarrow to put the digging tools in. I used twine to divide the table into quadrants and made these cute "bone bags" (Halloween treat bags I found at Target for 3/$1) personalized to each boys' dino name (we had Luke-o-saur, Brooks-a-tops, Deac-o-don, and P-Rex!) Found the digging shovels and rakes at Walmart for $0.50 each and got the skeleton dino bones at the Dollar Tree, a pack of 2/$1! This was so fun and one of the highlights of the party! Each boy got a personalized dino hat also (hats found at the Dollar Tree too and I used a chalk pen to write their names)!
For the fashion show, we let the girls sit on their "pink carpet" and show off their fairy wings (another Dollar Tree find) and wands (from Hobby Lobby). We had a cute photo opp and they were just too cute!
I also set up the "Dino Diner" for the boys food. This was just a little fun way to serve their lunch. The sideboard I used is lower than a table, so the boys were able to reach and get their food easily. The signs were super easy--just a quick print-off from the computer and using a glue stick to attach them to cardstock.
Along with the dino hats and dig bones, the boys took home dino coloring books as favors. Fairy wings, wands, and fairy storybooks were the ballerinas' favors. We also had two in-utero babies come to our party so they received a couple of baby storybooks!:) I easily wrapped all the books with celophane basket wrap (one of my favorite ways to wrap gifts) and made the gift tags with extra cardstock and the stamps I used on the cupcake wrappers.
Dino Dig


Fairy Ballerina Fashion Show


Dino Diner

Favors


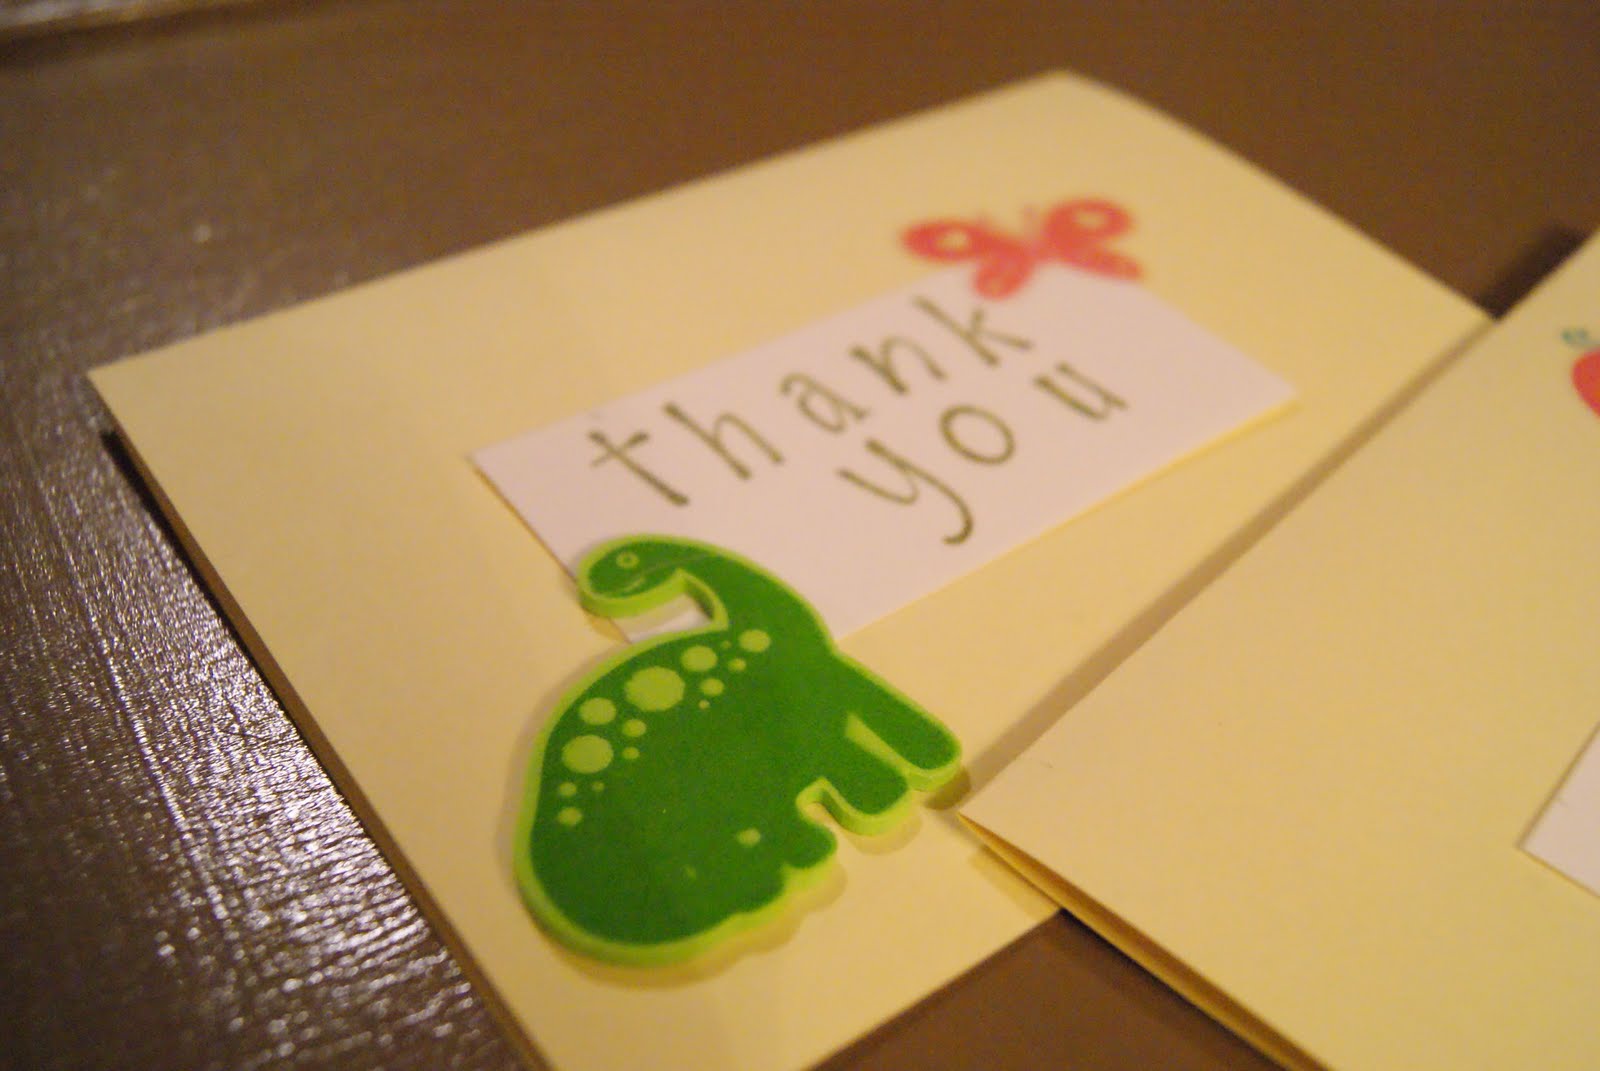
DIY Thank-you Note:
And finally, the thank-you notes! I knew I wouldn't be able to find notes that had both boy and girl themes together, so I just made these out of cardstock, recycled dino cupcake toppers, and little butterfly stickers (that I thought looked like the fairy wings). I used the same stamps again to do the "thank you" and then the birthday boy (because he's the only one who can color right now) personalized the inside with his own thank you artwork:) I used some left-over envelopes from last year's Christmas cards which happened to fit them just fine.


Overall, it was such a fun party! I really think the kids had a blast (mine and those who came!) which makes all the work worth it. I had so much fun putting these personal touches to each thing. I hope you've gotten some ideas you can use too and I'd love to hear of anything that you have done for your kids!
DIY Invitations:
After tossing around several ideas for their invitation, I ended up making them this way. Cardstock, my computer's clipart, a ruler, a paper cutter, and a little rick-rack were my best friends for this project!
First page: Dinosaur--"Stomp, stomp, stomp! Look at me! I'm turning three!"

Second page: Ballerina--"Plie, pointe, and pirouette for fun! Because Mia Lillie is turning one!"

Third page: Combined party information (address blacked-out)

DIY cupcake wrappers and toppers:
This is my latest DIY project that I'm loving for sprucing up cupcakes! As opposed to doing a lot of decorative icing, these wrappers are easy to make and can be customized to any party. I just found a template for the regular-sized cupcakes online (I can't remember the exact website, but there are plenty out there), and just altered it for the jumbo cupcakes. Loved the way these came out! And I'm still kicking myself for not getting a picture of the whole cupcake display! It turned out so cute, but oh well...
As far as the toppers, I simply bought the wands (pks of 12) at Hobby Lobby for the tutu cupcakes. For the dino cupcakes, I took foam dino stickers (again found at Hobby Lobby) and hot-glued them to toothpicks. I left the paper backing on the stickers, thus making them not stick to everything and being able to reuse them for thank-you notes (you'll see those on down).
Birthday boy cupcake:

Guest cupcake:

Tutu cupcake information: In addition to the wrappers for the tutu cupcakes, I made miniature tutus! This was so fun, although a bit time-consuming! I cut pieces of tulle, punched holes at the top, laced the ribbon through, tied the ribbon together, and added tape to the front and back to secure it onto the wrapper. I only had time to do 12, so for the additional cupcakes I used a stamp to make the wrappers that said "Mia is one!" Great thing about the tutus is that they are reusable since they were taped to a paper wrapper--so although time-consuming to make, I can reuse them! And as a sidenote, I used a single layer of tulle for the guest cupcakes, and used three layers for the birthday girl's jumbo cupcake!


DIY Decorations:
I had three main goals with the decorations--1) keep it simple and easy to do (pendant banner), 2) focus on the kids development over the year individually and together, as well as, sharing memories from the year (picture clotheslines), and 3) make it personal to each of them by adding individual touches (table centerpieces).
Pendant Banner--I ordered these two fabrics online (fabrics.com) and after looking at several other blogs, decided on the size of the pendants (which I can't remember exactly what I did, but I think it was around 9in across the top and 13in down the sides). I simply cut the pendants to size, cut out letters from felt, and hot-glued them on. I used twine and mini clothespins to put the pendants up, so it was a no-sew project (didn't have time for that!).


Picture Clotheslines--It took time to choose pictures from the whole year, but after doing that, I sent them to Walmart.com and had them printed. I made little tags to indicate the months throughout the year and any special events (Easter, baby dedication, etc). I used twine and mini clothespins again and hung them up!
Brother/Sister clothesline


Top line for brother, bottom line for sister


Sister's 9 month photo shoot:

Table centerpieces--I used burlap as the base for the centerpieces (my go-to fabric for just about everything). Then used scrap denim fabric and tulle for each display to add softness and another layer. I used theme-appropriate books that the kids already had. I liked this idea to personalize it because reading books to the kids is something I try to do everyday. I added dinosaur figures to Luke's side and pointe shoes to Mia's. I made the number picture holders out of wood numbers that I painted (originally black, found them in Target's dollar bins), a clothespin (to hold the picture) and alphabet stickers. To finish each side, I added the footprint and handprint artwork. I LOVE these and now have them hanging in our kitchen! Mia's was done as a craft in the nursery she goes to on Wednesday mornings (how fun it was to get it when I picked her up and the fact that it mentioned ballet in the poem!), which inspired me to do the handprint dinosaur for Luke. I had tossed around the idea of doing his invitations with a handprint, but after deciding that that would be too time-consuming, I wanted to use the one handprint I made. So I used colored pencils to make his hand stand out more and then drew additional spikes to make it look like a stegosaurus! I found the poem online and couldn't believe it actually mentinoned dinosaurs in it. I loved these as decorations and I love the fact I can have them as keepsakes.


DIY Party "Games" and Favors:
This year I wanted to have a couple of little activities for the kids to do, so we decided to go with a "dino bone dig" and a "fairy ballerina fashion show"! This was super easy to set up. We used our sand table (another DIY project of my dad's which I'll post about soon) for the "dig site." I used our small kids wheelbarrow to put the digging tools in. I used twine to divide the table into quadrants and made these cute "bone bags" (Halloween treat bags I found at Target for 3/$1) personalized to each boys' dino name (we had Luke-o-saur, Brooks-a-tops, Deac-o-don, and P-Rex!) Found the digging shovels and rakes at Walmart for $0.50 each and got the skeleton dino bones at the Dollar Tree, a pack of 2/$1! This was so fun and one of the highlights of the party! Each boy got a personalized dino hat also (hats found at the Dollar Tree too and I used a chalk pen to write their names)!
For the fashion show, we let the girls sit on their "pink carpet" and show off their fairy wings (another Dollar Tree find) and wands (from Hobby Lobby). We had a cute photo opp and they were just too cute!
I also set up the "Dino Diner" for the boys food. This was just a little fun way to serve their lunch. The sideboard I used is lower than a table, so the boys were able to reach and get their food easily. The signs were super easy--just a quick print-off from the computer and using a glue stick to attach them to cardstock.
Along with the dino hats and dig bones, the boys took home dino coloring books as favors. Fairy wings, wands, and fairy storybooks were the ballerinas' favors. We also had two in-utero babies come to our party so they received a couple of baby storybooks!:) I easily wrapped all the books with celophane basket wrap (one of my favorite ways to wrap gifts) and made the gift tags with extra cardstock and the stamps I used on the cupcake wrappers.
Dino Dig


Fairy Ballerina Fashion Show


Dino Diner

Favors


DIY Thank-you Note:
And finally, the thank-you notes! I knew I wouldn't be able to find notes that had both boy and girl themes together, so I just made these out of cardstock, recycled dino cupcake toppers, and little butterfly stickers (that I thought looked like the fairy wings). I used the same stamps again to do the "thank you" and then the birthday boy (because he's the only one who can color right now) personalized the inside with his own thank you artwork:) I used some left-over envelopes from last year's Christmas cards which happened to fit them just fine.


Overall, it was such a fun party! I really think the kids had a blast (mine and those who came!) which makes all the work worth it. I had so much fun putting these personal touches to each thing. I hope you've gotten some ideas you can use too and I'd love to hear of anything that you have done for your kids!
Wednesday, November 2, 2011
Postings to Come!
So I'm trying to jump back on the blogging band-wagon this week! Will have pictures of a DIY double birthday party by the end of the week! Check back!
Wednesday, August 17, 2011
Giving a Little Preview of You in Your Home
Someone once told me that three places in your home that you can give a flavor of your personal tastes and style and create a welcoming atmosphere are your front door, mantle, and dining table. These are areas that you can change up seasonally or as your tastes change, and give guests in your home a way of seeing what your decorating style is at first glance. I'm still working on my table, but I've recently finished updating the door and mantle. So, here is how I've currently decorated those areas, and of course, they are DIY projects that cost me hardly anything!
Front door:
View from the street

Closer up; my dad made this iron-art piece for me, the planter I pulled out of a trash pile!, and the personalized wreath I made very inexpensively (see below)

Upclose of the planter box; loved the weathered/aged look, this was exactly how I found it, and yes, out of a trash pile on the side of the road!

And here's the close up of the wreath; I found the wreath at Hobby Lobby, loved the unique shape of it, and it was half off. I then recycled this ribbon from the diaper cake made for me at Luke's baby shower! And the "D" I made out of a recycled FedEx box! I just drew the shape of the letter, cut it out, and used hot glue and burlap to cover it, then used hot glue to add the rick-rack; lastly used hot glue to attach it to the wreath. Easy as can be and practically free!

Mantle:
Here is the first version of my mantle. I've had the old window there for awhile, but just recently added the wreath. Got this idea from my friend, Tiffany, but loved it so much, I had to adjust the idea for my space.

Second version: I took out the moss orbs and added books that I turned pages out to uniform the color and make it more neutral. I also adjusted the other accessories.

Upclose of the wreath. Love how this adds so much to the window

Another view of the mantle

Last view from the other side

Hope you enjoyed this little piece of me through my spaces and maybe have gotten a few ideas for the first welcoming spaces in your home!
Sunday, June 26, 2011
Bedroom: Baby Girl Nursery
So, I'm FINALLY getting around to posting pictures of my baby girl's nursery. I figured although I don't feel "finished" with the room, I'd go ahead and share what all I've done up to this point.
Welcome to Mia's room:

The following pictures are traveling around the room from left to right:

(The top of this little green dresser is not really decorated yet; these are just pieces that will be incorporated in the room somewhere)


This room started out as an office, painted a dark green Behr color called Painted Turtle. So after some priming and two coats of two different pink paints (Behr, My Fair Lady, bottom wall color and Coy Pink, top wall color and ceiling) we got this lovely little girl's nursery! I also decided to use brown trim to separate the pinks to give a little weight to the bright and airy pink walls. The trim is about 10-12 inches from the ceiling as opposed to chair rail height or molding height:

This green display shelf was made by my grandfather and was in my room growing up painted white. I painted it green and added fabric to the back of it.

Here are some upclose pictures of the shelves:
Top of the shelf--Mia's footprints at 8 weeks propped up against a pink plate, a Precious Moments ballerina given to me by my dance group, an antique glass-lidded container, and Momma as the Dewdrop Fairy:)

Sorry this picture is blurry, but used a little silver tray as a background for one of her newborn pictures, along with a pink basket propped on its side, and her Bible

Covered a frame with fabric and put this picture of Luke kissing her head

Spray-painted a clearance clock from Hobby Lobby ($2.99) and an antique vanity handheld mirror and (not-pictured) a silver tray with a candle to round out the bottom shelf

My mom made this sweater and bonnet for me when I was a newborn! Perfect colors for this room and I love this heirloom piece. I've actually noticed in putting together Mia's room that I'm very fond of heirloom pieces. I absolutely love things with family history attached to them!

This is one of my favorite things in the room. I first showed you these vinyl wall decals when I posted the pictures about Luke's room. I got them from this online store (loved working with this company--so friendly and created exactly what I wanted!). I got a scrap piece of sheetrock, painted it the wall color, and made a foamboard frame covered with batting and fabric. I then added the fabric-rolled flowers that are all over blogland right now. I intend to add more flowers, but haven't made them yet! These are so easy and are made from scrap fabrics, so they are free!


Now for a few upclose details around the room:
This is the same dresser I used in Luke's nursery, but changed out the knobs. Got these from Hobby Lobby when they went 50% off.

The light fixture. This used to be in my childhood room and I just love it in here!

I got this chandelier from Hobby Lobby as well when it was on half off sale. I love it and just had to have it in her room! It hangs over the crib.

I turned this brown basket on its side to use kind of like a shelf on the other end of the dresser to give me more dresser/changing table space. I also revamped the lamp, which you'll see in a minute.

I didn't want the humidifier to be so obvious (and it was blue which just wouldn't work;)) so I took an old Pampers box, cut it to size, and covered it with fabric.

Here's the DIY crib bedding! This was quite a project that I worked my way through by searching on the internet to see how others did it! I made the crib skirt based on Luke's old one and then covered his old bumpers with this new fabric and ribbon. It was actually pretty easy, just time-consuming. In fact, the entire inspiration for the room was from these fabrics I found at Hobby Lobby. I started with these fabrics then pulled all the colors from them.


I found this "M" coat/bag hanger at the thrift store for $2. It started out blue so I painted it green and added the polka dots. The bag was a baby gift that Mia will use as her first ballet bag, and I made the tutu for her during the pregnancy. The tutu was also extremely easy, which I'll do a separate post for. This wall is still being switched around, so I don't think the bag and tutu will hang here permanently, but I wanted it out when she was first born (indoctrinate early;)!

This was my rocker in Luke's room, so I just made the pillows with scrap fabric to add a little girlyness to it.

My mom and I worked on this black-out curtain (found on clearance at Home Goods, maybe $8.99). You can see the top and the bottom of it. We added the pom-pom fringe to the top and then the fabric and trim to the bottom to make it longer. I wanted to hang it above the actual height of the window, to make the window look bigger, so that's why I added the fabric to the bottom. I just love this little paisly fabric!


This is the wall above the dresser/changing table. The corkboard started out as a plain, tan, run-of-the-mill corkboard. I painted the frame green and then used the fun fabric to cover the cork. Took some ribbon and thumb-tacks (painted green to add some personality) and made a little diamond pattern to stick notes or pictures under. The top, small window box with the animals, I just covered with batting and scrap fabric and then hung an antique vanity tray mirror underneath.

Here's the upclose of the revamped lamp. The base was clear crystal and gold so that was spray painted pink and then I took the old shade and hot-glued ribbon around it. Finished it out with scrap pom-pom fringe.

So there it is! I've had so much fun pulling decor together for this room. I still want to readjust some of the shelving knick-knacks as well as get a rug, but I definitely wanted to get this post done before the original things were switched up. I want to remember version #1! I'll keep you posted on how I update it!
Thanks for sticking in there with me on this blog. It's slow going, but I'm hoping to start posting more. I love sharing and getting new ideas with the blogworld! Let me know the latest room you are working on in your home!
Subscribe to:
Posts (Atom)