Before--originally a nursery (these were the original pictures of the nursery, I changed it up and brought other furniture in since I took these pictures, but it at least gives you an idea of the original walls and colors):


After--now, a big boy room:


Every room needs an inspiration. This summer outfit of Luke's was mine! I was trying to decide on colors for his room and I thought the red, blue, and gray would be perfect---seeing it all together in this outfit, inspired me!:) So now it is hanging on the wall to the left when you enter the room. Also there is his handprint at 1 year old and a basket storage unit. Storage is key in a kid's room and this is one of many places I have his toys. I'm still considering painting the baskets, but another project for another time...


I switched out his original chair (which is now in Mia's room) for this smaller rocker chair. It was originally a salmon-pink but I just used this blue sheet (I got for about $5 at Wal-Mart) to cover it. I'm still trying to figure out how to secure the sheet and make it look neater, but this is the temporary fix at least.

And here is the new window treatment. I found the darkening curtain on clearance for $8 at Home Goods and the cornice is actually made out of foam board, not wood! So inexpensive and easy! I'll have a how-to post on this to come.

Continuing around the room you see the customized wall vinyl I had made through this company. Jodi's vinyls are very reasonable priced and she is so easy to work with and completely customized both his and Mia's names to just how I wanted them. I will have a how-to on this project too, because I ended up framing out a piece of sheet-rock to stick the vinyl on, so that I could take these with us whenever we move.

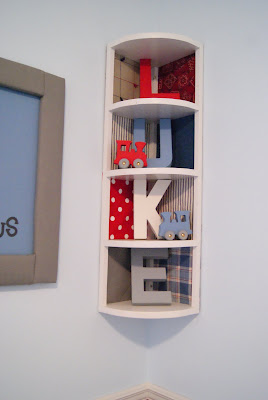
Here is the corner shelf above the bed. I used fabric scraps in the back of the shelf, repainted his name letters, and painted these wooden trains I found at Hobby Lobby.

And this bulletin board is on the wall you see as you enter. I had the molding already up and just bought a piece of corkboard from Hobby Lobby to fit into it. Trimmed it out with the red trim and put the foam trains in the corner. This will be a great place to hang Luke's original artpieces!:) And the small canvas pieces hanging below it are my original artpieces! Just painted railroad signs I found on the internet with the colors used on his walls.

Upclose of the stripes. Just painted over the original blue and green with red and a darker blue; also added gray.

Here's an upclose of the bed pillows. I made all of these, either by recovering an existing pillow or making a case and stuffing it. The comforter I found at Wal-Mart for about $20 and the platform bed frame was made by Ross and my dad!

Here's an upclose picture of the bed frame with the much needed storage drawers! Dad designed these to be deep and long so that all Luke's puzzles, blocks, balls, etc. could fit.

Switched out the long dresser with changing pad (took that to Mia's room) for this chest of drawers with cabinet storage. This was the other piece of furniture in the set with the original dresser that I got from my grandparents. Painted and distressed it to match and switched out the knobs.

Here's the last wall. Ross spray-painted the bookshelf for me with in a glossy red (was originally blonde wood and then cream/green distressed to match the nursery). The canvas bins on the bottom shelf are from the dollar store and are perfect for toy storage. The 3 shelves were sprayed glossy gray. Two shelves I had and the other one I found at the thrift store for $2. The decor on them is still being changed around, so I'll post an updated picture when I have it.

One last pic with a satisfied customer!:)


No comments:
Post a Comment